To Mick's
Flight Sim Page
rev. 5-2008
 |
|
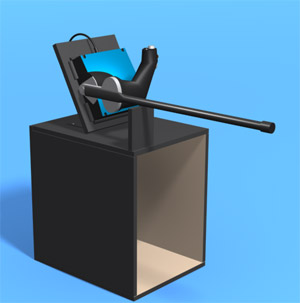
Making
a Collective
Pitch Lever from a
Saitek X45 Throttle |
A while back I came across
an article describing how to convert the joystick from the Saitek X45 (2-piece
joystick/throttle combo) into a cyclic. The page has since been taken down.
But I figured "Why stop there....why not convert the throttle into a collective
pitch lever?"
It's a pretty simple procedure...if
you can build a box and glue a few things together, you can handle it. It's
also pretty inexpensive as these things go…the X45 combo costs roughly
$60 US, the other materials set me back a little under $20.
First, a few caveats: You
won't have any buttons or switches at the end of your stick. They'll still be
there - you won't be cutting any wires or messing with the electronics - but
all those buttons and widgets will be a bit awkward to access in their new orientation.
However, once you start using a collective to set power you'll love it, and
never want to go back to your conventional throttle again. Which is a good thing,
since you can't. You'll have a huge lever permanently glued to it!
Here are the materials you'll
need:
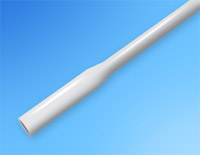
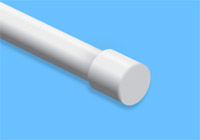
- About 20" of ¾"
PVC pipe
- End cap for the pipe
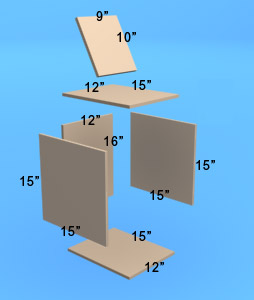
- ½'" particle
board - see diagram below for sizes
- Molding strips to hold
the throttle in place (see Step 6)
- Angle brackets
- Glue (Elmer's Ultimate
works well)
- Nails, and flat black
spray paint
 |
|
Here are the dimensions for the particle board. If cutting wood isn't
your thing, stores like Home Depot will cut it for you at a reasonable per-cut
charge. |
- The first thing you'll
need to do is decide how big you want your lever to be. These illustrations
show a 22" long extension, but I've since shortened it to about 17".
This helps prevent the lever from slowly dropping under its own weight and
giving you that sinking feeling when you're trying to hold a hover!
- Once you've cut your
pipe to the desired length, you need to flatten out the last 5 inches or so,
so that it will make good contact when glued to the throttle handle. I did
this by heating up the end of the pipe over a gas grill (barbecue sauce optional!),
then flattening it between two pieces of wood.
- Next, sand the parts
of the plastic - both the pipe and the throttle handle - that will come in
contact with each other, and glue the pipe on. I used Elmer's Ultimate Glue
for this. If you follow the instructions on the label (notice the part about
wetting down the contact surfaces first), clamp it in place with a small C-clamp,
and let it cure for 24 hours, you should get a gorilla-proof bond. Also keep
in mind that this glue expands as it dries - in case you're going for neatness.
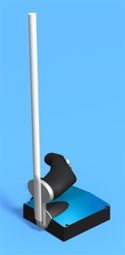
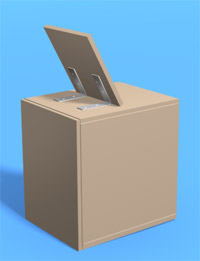
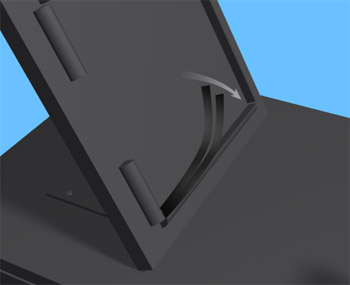
- Next, assemble the parts
of the stand shown below. I glued it together with the above mentioned glue,
although if I had it to do over I could have done a neater job with nails
(the expansion thing again). The angled piece on top is attached with big
angle brackets, bent to about 62 degrees (which will make the lever parallel
to the ground when in the down position).
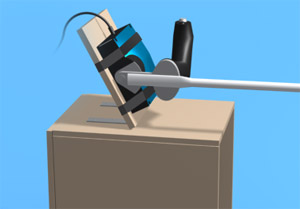
- At this point, you can
attach the throttle to the angled piece temporarily using electrical tape,
and test it out. Try positioning it at different heights, to see where it's
most comfortable. Normally, you want the lever about even with the top of
your seat, or a bit higher. (If you don't use pedals and plan to add them
to your setup later, keep in mind that you'll want to set your chair much
lower than a normal working position). Once you've got the throttle where
you want it, mark the position on the wood with a pencil.
This is also a good time to adjust the tensioning screw that's at the bottom
of the base. You need a lot more tension now, to prevent the handle from settling
when you take your hand off it.
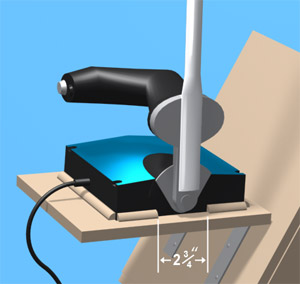
- Now, cut some pieces
of wooden or plastic molding to fit around the throttle base - they'll be
what holds it in place. Notice how you need to leave a gap - about 2 3/4"
- in one side to accommodate the throttle handle as it moves. The way I attached
the molding pieces is by propping up the box in such a way that the throttle
could rest flat on the angled piece, then gluing them on - being careful to
fit them as tightly as possible around the throttle base. It's a good idea
to tape them in place while the glue dries.
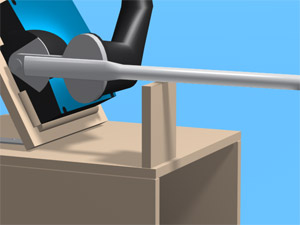
- Once the glue is dry,
test the thing out again. If the throttle doesn't fit snug enough between
the molding, tape it temporarily in place again - you can shim it up later.
At this point, take a measurement of the space between the top of the box
and the lever in its down position. Cut a small piece of particle board to
this length, then glue it in place so that the lever can rest on it when it's
in the down position. You can also put some felt or Velcro on top of the piece
for cushioning.
- Put the endcap on the
lever.
- Mask all parts that you
don't want painted, and spray paint the unit. Flat black looks good on the
particle board, and semi gloss black on the lever.
- Shim one of the molding
strips with a few thicknesses of electrical tape, so that the throttle base
fits tightly in place.
- At this point, your collective
should be fully functional. It's range of motion is 56 degrees, which is a
bit much. If this bugs you, you could invest in a copy of FSUIPC, which, with
a bit of tweaking, will allow you to give it a narrower range of motion. (Unfortunately,
you can't do this by using Windows, FS9, or the Saitek SST utility.) Lately
I've just been using it at the full range, without FSUIPC, and it doesn't
bother me.
- One final test: Open
the game controller settings (Start > Settings > Control Panel >
Game Controllers). Then pull up a bit on the collective. The red bar for
the Throttle callibration will move upward in response. Make sure it
doesn't start moving slowly downward after you take your hand off the collective,
which would indicate that the lever is settling due to its weight. Try it
with the lever in several different positions. If it's drooping, tighten the
throttle's tension screw some more. If the tension screw is maxed out and
the lever still settles, your options include shortening the stick, removing
the endcap, or using an index card to shim the handle where it rubs against
the throttle base.

That's it! Now have fun flying with your new collective, and ignore any jokes
from your friends if they ask what you're trying to compensate for with that
huge lever!
- Mick Posch